Couple of years ago, Anaren marketed a radio frequency chip with
an integrated antenna working at 900Mhz and based on Code Division Multiple Access
Technology (CDMA) technology. Their product was based on Texas Instruments (TI)
cc1110 chip and thus TI supported Anaren to market the booster pack board. In
addition to anaren RF chip, the booster pack included a board having a
prototyping area and a space to place a TI msp430 microcontroller. Off course,
Anaren’s booster pack would best work with TI msp430 Launch Pad, see pictures
below.
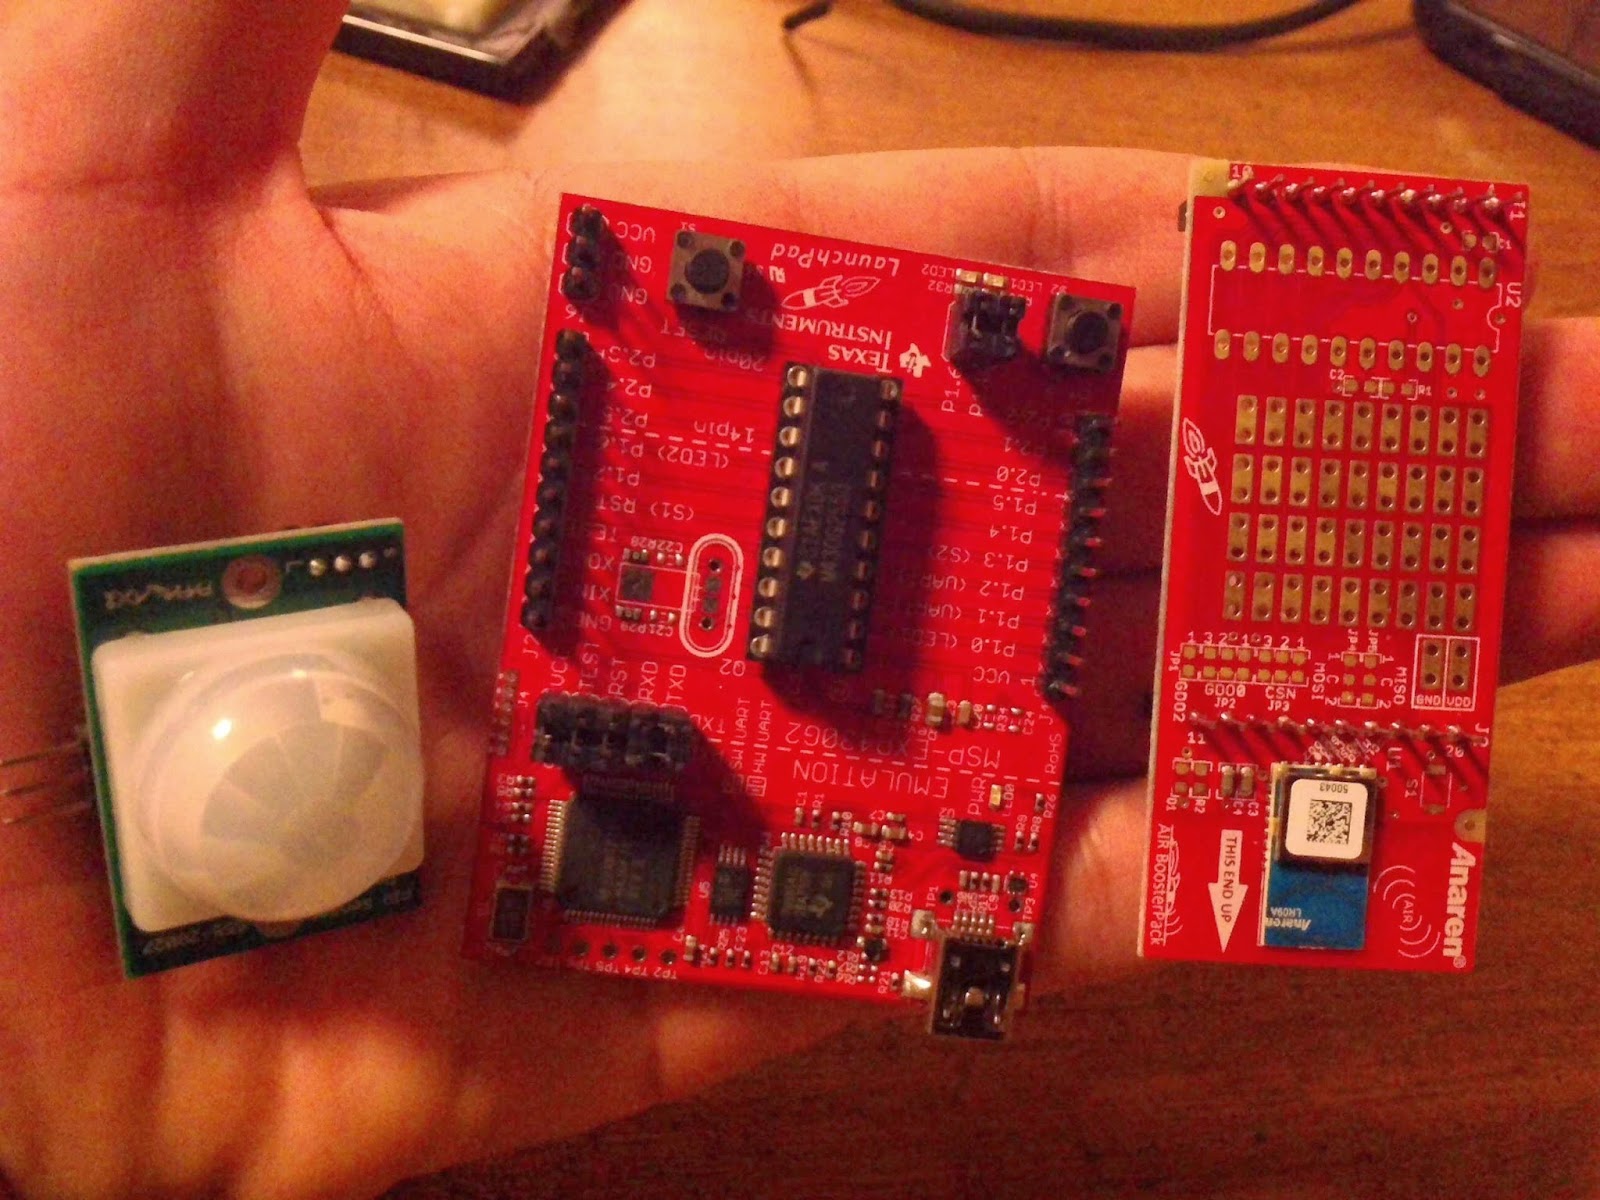 |
| Figure 1 from right to left Anaren booster pack, TI Luanch Pad, and PIR motion detector sensor |
Now, Anaren have their Zigbee chip, Bluetooth chip and
finally the celebrated Bluetooth SMART chip. Since their first RF chip (CDMA,
900MHz) was soled at a humble price, and because taking this course helped me to know how to program
msp430 ( had to buy and use a TI msp430 lunch pad to do assignments!), I have
decided buy one of Anaren booster pack and play around with it. The booster
pack has two boards with Anaren RF chips, two microcontrollers pro-flashed with
Anaren software stack. Since the later is the most important part in Anaren
product, this post will mainly talk about programming the msp430 micro controller to do a certain task involving RF communication. First I had to
establish communication between the boards without adding any payload from an
external source, this was the easy part. See this link and picture below.


While experimenting with the booster pack, I needed payload
to transmit over the radio frequency link. There were many options including Boolean
one/zero, digital data from a sensor, analog data converted by microcontroller
to digital data stream. The choices are governed by the fact that booster pack
is best used with msp430 launch kit. My choice was a simple one/zero coming
from a passive infrared sensor (PIR sensor). You can buy PIR sensor from Radio shack or you can order it
from Parallex website. The sensor is made of a basic Pyroelectric sensor and a Fresnel lens covering the sensor; the later is made of a material that pass infrared spectrum between 8-14µm only. Pyroelectric sensor is divided into two half; each half will detect the infrared level on its side as shown below. When both sides reports same levels of infrared they will cancel each other out and no motion is reported. Now parallax claims a field of view (FOV)of 90 degrees; for a explanations of FOV you can see this link (one of my favorite blogs).
 |
| Figure 2 Radiated Spectrum with Infrared light wave length marked |
 |
| Picture courtesy of http://electronicsgurukulam.blogspot.com |
The programming task of any application involving the booster pack is to allow the micro controller to send and receive data over the radio frequency link and in the same time process data coming from an external source. The normal solution to this problem was to use interrupts.
Since I had some cool project in mind, the following requirements were already set as the goal of my program:
Upon detecting motion, turn on a led,
As long as motion continues, keep led on,
If motion stops, do not turn led off until a certain time period has elapsed with no motion.
this required two types of interrupts, one to detect signal coming from the PIR sensor and anther timer interrupt to measure the time while no motion is detected. Many tutorials on the internet exist on programming interrupts in TI micro controllers especially msp430 micro controller, one of these is tutorial found here. It had tips how to obtain required voltage, 5volts, to power PIR sensor out of the msp430 Launch Pad (msp430 micro controller works on 1.8v-3.6v). In my cause I used 5 volts from an external source, used +5v from Arduino, but in a following post we will see how to setup a voltage regulator to obtain 5volts from any voltage. Here you can find my program
#include "msp430g2553.h"
#define DELAY_05s 62500
boolean Lockhigh=true;
unsigned char counter = 0;
void setup()
{
WDTCTL = WDTPW + WDTHOLD; // stop WDT
// P2.2 is PIR input
P2OUT |= 0x04; // clear input to prevent interrupt on start (just in case)
P2IE |= 0x04; // interrupt enabled
P2IES &= ~0x04; // hi edge but might be changed depending on your PIR
P2IFG &= ~0x04; // IFG cleared
P1DIR = BIT0; // P1.0 is RED LED on LaunchPad
P1OUT =~BIT0;// Turn OFF RED LED
TACCR0 = DELAY_05s;
BCSCTL1 = CALBC1_1MHZ; // Set DCO to calibrated 1 MHz.
DCOCTL = CALDCO_1MHZ;
TACTL = TASSEL_2 + MC_1 + ID_3+TACLR; // SMCLK, upmode , /8
TACCTL0 = CCIE;
__bis_SR_register(LPM4_bits + GIE); // switch to LPM0 with interrupts
}
void loop()
{
}
// Timer A interrupt service routine
#pragma vector=TIMER0_A0_VECTOR
__interrupt void Timer_A()
{
if(counter == 10 & Lockhigh ) {// If no motion while time reached 5sec
counter = 0;
P1OUT =~BIT0; // RED LED OFF
__bis_SR_register_on_exit(LPM4_bits); // switch from LPM0 to LPM4
} else {// motion or while no motion and time still <5 sec
counter++;
}
}
// Port 1 interrupt service routine
#pragma vector=PORT2_VECTOR
__interrupt void Port_2()
{
if (Lockhigh){P1OUT = BIT0;} // Turn on RED LED in case of motion being detected
Lockhigh=!Lockhigh; //Toggle Lock (indicate no motion period /end of no motion period)
P2IES ^= BIT2; // toggle edge to catch next edge of the PIR signal
counter = 0;// restart timing
__bic_SR_register_on_exit(LPM4_bits-LPM0_bits); // switch from LPM4 to LPM0
P2IFG &=~0x04; // IFG cleared
}
Program written within Energia environment. It follows the guidelines
above, if motion detected turn RED led and if 5 seconds elapsed with no motion
turn GREEN led on. Below, you will find a video of the program in action.
Stay tuned to see how to use PIR motion sensor with the Anaren booster pack and see why we used Energia environment in the program above!
No comments:
Post a Comment